


Controls vary depending on your device. Please view the HELP screen for control-specific details.
You can move blocks left one column, right one column, all the way to the far right, all the way to the far left, and drop them to the bottom.
Combinations of moves are achievable with a little experimentation.
Match identical blocks to eliminate them. The more blocks you connect, the higher your score.
Watch for sudden bonus opportunities and beware of obstacles that can instantly change the game.
Survive as long as you can, as difficulty and speed increase with each level.
The supply count indicator shows how many blocks you have remaining to stack. Some hazards will reclaim blocks and add them back to this count. Levels are completed when your supply count reaches zero.
Prioritize and create triple-block scoring opportunities over double blocks. Each triple-block scoring stacks another bonus multiplier. Completing a level with a bonus multiplier still active grants additional bonuses based on the bonus multiplier stack size.
Big scores are not as simple as connecting many two block sets, until you run out of blocks. Triple-block or better scoring and finishing your last block with an active bonus mulitpliers is key to big scores.
Blocks connected vertically or horizontally (not diagonally) of the same type score points. Each block in a match is worth 1 point. Matches are multiplied by the number of blocks connected. Wildcards and bonus multipliers add additional points.
Examples:
2 blocks (1 + 1) × 2 = 4 points × bonus multipliers + wildcards
3 blocks (1 + 1 + 1) × 3 = 9 points × bonus multipliers + wildcards (+Bonus Multiplier – Takes planning)
4 blocks (1 + 1 + 1 + 1) × 4 = 16 points × bonus multipliers + wildcards (+Bonus Multiplier – Hard to get)
5 blocks (1 + 1 + 1 + 1 + 1) × 5 = 25 points × bonus multipliers + wildcards (+Bonus Multiplier – Rare to get)
6+ blocks – The Mother Lode of scores (+Bonus Multiplier – Lady Luck shines on you!)

In most cases, scoring occurs as soon as a block lands and matches another block.
In some cases, scoring is delayed, allowing for more than four blocks to be connected. This normally only occurs during a hazard affecting blocks as it passes by, a supernova event, or with the use of a gravitational distortion device.

Dead blocks do not score points and form more of a hazard than anything else. Bomb blocks can clear them, but they mostly just mess up your layout. They are common, and a good strategy is to land them out of the way as much as possible.

Wildcards match any block type directly above, below, left, or right—except for dead blocks. Each wildcard used in a match adds an additional +50 bonus points.

Bomb blocks are a great way to clean up a messy layout. They explode a few seconds after settling in place and can completely eliminate blocks in the surrounding area, including dead blocks.
Bomb blocks only begin to appear at level 3 and become more common as the game level increases.

Triggered by matching three or more blocks or hitting a bonus satellite with blocks.
Lasts 15 seconds and resets to 15 seconds every time you score.
Disappears if you fail to score again within 15 seconds.
Matching any two or more blocks while a bonus multiplier is active renews the 15-second clock. Matching three or more blocks increase the bnus multiplier stack.

There are five types of cloud hazards that can randomly cross the grid. Some push blocks up, others delete blocks, while others can return blocks to the supply count or change their color. A meteor can also appear and destroy blocks entirely. The longer you spend on any one level, the more hazards you will face. Additional hazards can appear and affect gameplay in many ways.
Time is critical to your success. Every game level has a specified amount of time to be completed. Ninety seconds before your time runs out, a Supernova will explode and unleash chaos. Effects vary and can be both beneficial and hazardous. Supernova explosions unleash debris, and if you are hit by this debris, you lose the match.

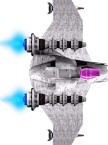
From time to time, spacecraft will cross your path. These ships can destroy blocks or even convert them into dead blocks. They have no specific agenda other than chaos. Hitting them with blocks can eventually destroy them, and you get a nice bonus if you can pull it off. Given enough time, these craft can completely wipe out your grid or turn it into nothing but dead blocks. Be warned that spending your time trying to destroy these craft is worthwhile, but will likely cost you your bonus multiplier stack in the process.
Note: If you have an active bonus multiplier and hit the spacecraft with a block, the bonus timer will extend by 2 more seconds per hit, up to the maximum of 15 seconds.

These little beauties are random and valuable. Hit them with blocks to activate or stack additional bonus multipliers. Each block that hits a satellite stacks one additional bonus multiplier. Bonus multiplier and remaining time are displayed on the HUD.

These are limited and can make the difference between winning and losing a match. They can appear anytime during a match and are guaranteed only once per level. Hit them with a block and collect them in your toolbox.
Activating them triggers a three to six second gravitational distortion that will shake the very foundation of your block structure to collapse. This can not only give you a significant score boost but can also take a really bad block layout and make it better.
Try not to waste these, as having more than one gravitational distortion device in your toolbox is extremely rare and a critical strategy for more difficult levels, or just times when bad luck strikes.
Scoring five or more blocks all at once has a probablity of sending another gravitational distortion device flying across the screen for you to collect. In these rare moments, the stars have aligned to honor your accomplishment, so collect it quicklly!
Blocks fall from the top of the grid. You can move blocks left or right (by one column or all the way to the edges) and move them down quickly or let them free fall slowly. If a block collides with another block mid-move, it stops immediately and returns to free falling. If this happens on top of another block, it will land there. Once stopped, blocks are fixed but can still be cleared through matches or by using wildcards or bomb blocks.
Once you reach level 3, more than one block will drop at a time as a unit.
First you will experience two blocks side by side or vertical. They may or may not be the same block color and will move as a unit, just as a single block does.
As your game level increases, you will eventually be facing three block drops and again, as your game level increases, the block drops will become random, alterating in quantity and layout.
One good thing about multiple block drops, is you run through your supply count faster. It is during the chaos of these levels, where you are going to wish you had saved up those Gravitational Distortion devices.
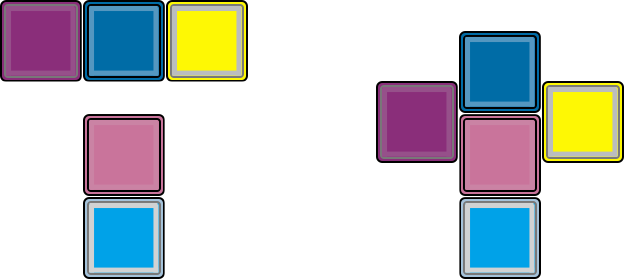
Multiple block drops split into individual blocks, anytime any block in that unit is landed.
In cases where one block breaks the unit and two remain, you will only have control of one of the remaining blocks at a time. Get that block landed as quickly as possible to gain control of the other block.
Clear your entire block supply before the stack reaches the top or time runs out. Levels feature random events and hazards. A level is completed when your block supply count (shown on HUD) hits zero.
The game ends when any block settles at the top row of the grid or your TIME runs out.
Free-Blocks can be played in portrait or landscape mode, but the game locks to the chosen orientation based on how the device was turned when you loaded the game.
Portrait mode → Taller, narrower grid.
Landscape mode → Wider, shorter grid.
The game automatically scales to fit your device, giving you up to 34 columns or 34 rows, then calculating the opposite dimension for that orientation. Enlarging your block size will affect this and reduce rows and columns accordingly.
No two games are the same. Bonus items and hazards appear randomly, making each playthrough unique and exciting.
💡 Tip: Try for matches of 3+ blocks to trigger stackable bonuses. Once a bonus is active, keep scoring any way possible at least once every 15 seconds, or your bonus stack will entirely disappear.
💡 Tip: Completing a level while a bonus multiplier is active adds a huge bonus to your level score. Keep an eye on how many blocks remain and your time, and keep that bonus alive.
💡 Tip: Dead blocks can be hazardous, but clearing 10 or more dead blocks in a single horizontal line gives a huge bonus and clears them from the grid.
💡 Tip: Experiment with different block sets or scale the blocks bigger or smaller for better visibility and comfort. More block sets may be added in the future based on feedback.
💡 Tip: Time is not on your side. If time runs out, you lose! Balance time and scoring for the best match results.
💡 Tip: Destroy spacecraft as quickly as possible, but try not to use wildcard blocks to do this, as they are worth more for scoring than as projectiles. A bad block layout can often be cleared by a spacecraft. It may be worthwhile to allow the little spaceship to do its work and clean up your mess.
💡 Tip: Completion of a level is saved to your games list for that level. You may restart at that level as many times as you like. As you climb in levels, your start saved points climb with you.
💡 Tip: Gravitational distortion devices are lifesavers, but they need to be used at the appropriate time and conserved whenever possible, but they do not carry over.
I am often asked what a good score per level is.
All I can say is, replay the lower levels a lot. That’s where you build your experience to take on the high levels, where things get much tougher.
It takes planning, a bit of luck, and serious patience to earn big scores. You might not make it on the leader board for some of the lower levels, but just might shine when things become more chaotic at the higher levels.
The leader boards are broken down by Level and Difficulty. There is a leader board for every level at every difficulty played, and you can rank on a leader board for any top 100 score. While this limits the number of players shown, it does not necessarily mean that a top 100 score on level 1, difficulty Normal, will mean that the same player is capable of making it onto the top 100 list for other levels. Level and difficulty are serious challenge modifiers.
If you just want to make it anywhere onto the top 100 leader board, run through the leader boards and pick a level and difficulty that works for you. It is not unusual for a person who excels at a particular level and difficulty, to not make the top 100 on the previous or next level.
Good luck and have fun!
